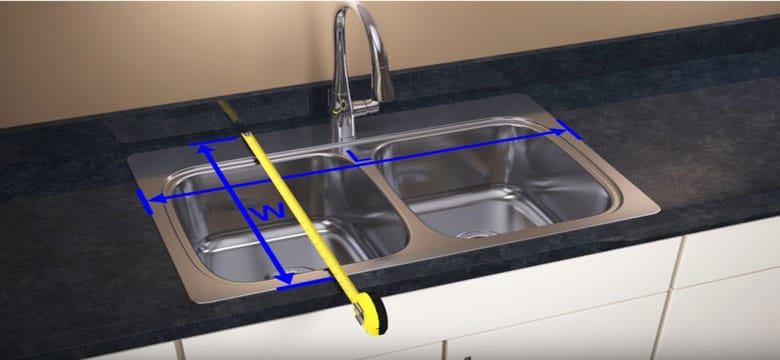
To measure for an undermount kitchen sink in a U.S. kitchen, record the cabinet width, available sink space, countertop cutout, sink depth, and plumbing clearance. Do not measure only the old sink basin. The sink’s installation template and the manufacturer’s minimum cabinet size must also match your space.
Introduction
Measuring for an undermount sink is a little different from measuring for a drop-in sink. An undermount sink sits below the countertop, so the counter opening, cabinet, clips, faucet, drain, and plumbing all need to work together.
Use a steel tape measure and record every measurement in inches. If you are replacing an existing sink, measure the cabinet and the current countertop opening. If you are installing new countertops, choose the sink first and use its factory template to create the opening.
The safest rule is simple: use your sink manufacturer’s installation guide as the final authority. Sink dimensions, corner shapes, mounting systems, and cabinet requirements vary by model.
What You Need Before Measuring
Gather these items before you start:
- Steel tape measure
- Pencil and paper
- Straightedge or ruler
- Flashlight
- Camera or phone
- Level, if available
- Manufacturer’s sink specification sheet
- Existing countertop or sink cutout measurements
- Cabinet width and interior measurements
Turn off or avoid disturbing the water lines unless you are removing the old sink. If you must disconnect plumbing, shut off both water supply valves first. A licensed plumber or countertop professional should handle work that involves moving supply lines, drains, gas lines, stone cutting, or structural cabinet changes.
The Key Measurements to Take
Measure these areas in order:
- Base cabinet width
- Cabinet interior width
- Available front-to-back space
- Countertop thickness
- Existing cutout length and width
- Sink overall length, width, and depth
- Drain and plumbing clearance
- Faucet and accessory locations
Each measurement answers a different question. The cabinet tells you whether the sink can fit. The countertop opening tells you whether a replacement sink can cover the hole. The plumbing measurement tells you whether the bowl will interfere with the drain or disposal.
1. Measure the base cabinet width
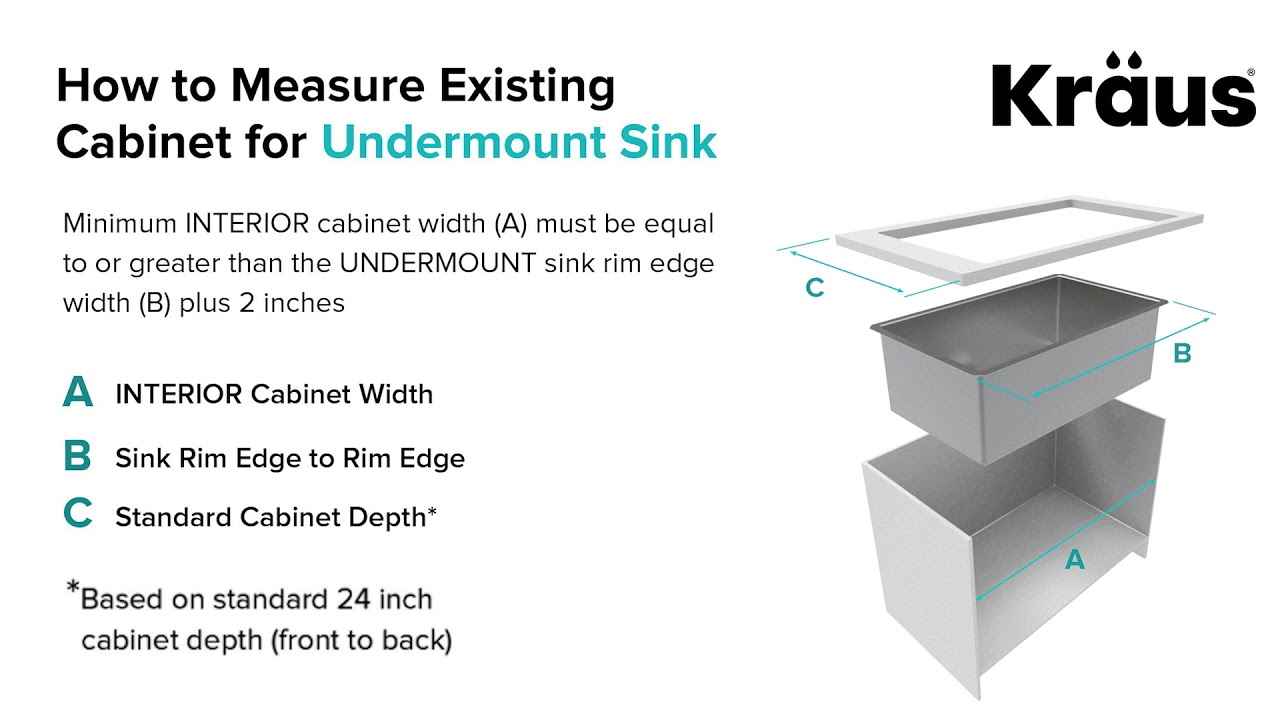
Open the cabinet below the sink and measure the cabinet from outside edge to outside edge. This is the cabinet’s nominal width, such as 30, 33, or 36 inches.
Then measure the clear space inside the cabinet from side to side. Include obstructions such as:
- Cabinet walls
- Face-frame rails
- Drawers
- Pull-out trays
- Water filters
- Brackets
- Disposals
- Plumbing
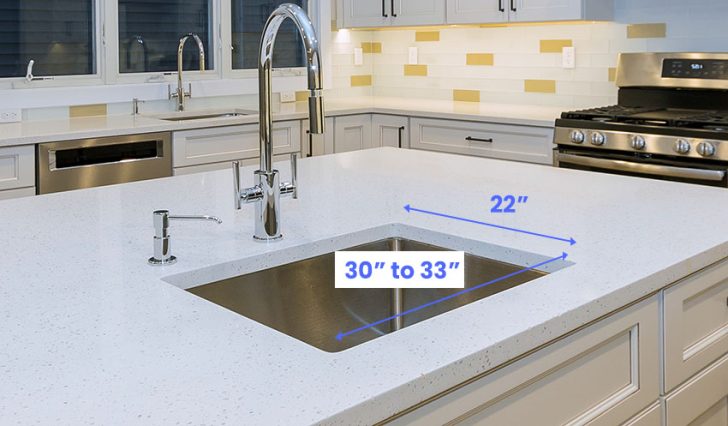
The manufacturer may list a minimum cabinet size. This is not always the same as the sink’s outside width. A 30-inch sink may require a 33-inch cabinet, depending on the sink design and its mounting system.
Never assume a sink fits because its listed width is smaller than the cabinet width. Check the exact model’s installation sheet.
2. Measure the available cabinet depth
Measure from the inside front of the cabinet to the back wall. Then check how far the sink can extend toward the cabinet front and back.
A standard U.S. kitchen counter is often about 24 inches deep, but the usable space may be less because of:
- The cabinet face frame
- The countertop overhang
- The backsplash
– A rear support rail - Plumbing
- A window or wall behind the sink
Measure the sink’s front-to-back dimension, not just its bowl size. A large farmhouse-style or extra-deep sink may need more space than a normal undermount model.
3. Measure the existing countertop cutout
If you are replacing an undermount sink without replacing the countertop, measure the existing opening from below or above.
Record:
- Opening length from left to right
- Opening depth from front to back
- Distance from the opening to the countertop front edge
- Distance from the opening to the backsplash
- Corner radius
- Countertop thickness
- Faucet-hole location
Measure the opening at several points. Older cutouts may not be perfectly square or even.
For a replacement sink, the new sink’s rim must cover the existing opening. The new sink must also fit the cabinet below. A sink that fits the hole may still fail if its bowls, clips, or plumbing do not fit the cabinet.
4. Measure the countertop thickness
Measure the counter at an exposed edge or near the sink opening. Countertops may use materials such as:
- Granite
- Quartz
- Marble
- Solid surface
- Porcelain slab
- Concrete
- Wood
The mounting hardware must suit the counter material and thickness. Some undermount sinks use clips attached to anchors set into the countertop. Others use adhesive, brackets, support rails, or a combination of methods.
Do not drill into stone or quartz unless the installer and sink instructions allow it. A countertop fabricator usually prepares the sink edge and mounting points.
5. Measure the sink’s overall size
Sink listings often show several measurements. Read them carefully.
| Measurement | What it means | Why it matters |
|---|---|---|
| Overall length | Outside edge to outside edge from left to right | Must fit the cabinet and counter |
| Overall width | Outside edge to outside edge from front to back | Must fit the counter depth |
| Bowl length | Usable inside length of the basin | Helps with pots and pans |
| Bowl width | Usable inside width | Helps with large cookware |
| Bowl depth | Top of bowl to lowest point | Affects comfort and plumbing |
| Minimum cabinet size | Smallest recommended cabinet | Key fit requirement |
| Cutout size | Required countertop opening | Controls counter fabrication |
The overall sink size and bowl size are not interchangeable. The sink’s rim, divider, flange, and corner radius take up space around the bowls.
How to Measure an Existing Undermount Sink
If the old sink is still installed, measure it before removal. You can also measure it after removal, but the opening may reveal more useful information.
Step 1: Photograph the installation
Take photos from:
- Inside the cabinet
- Below the sink
- Above the counter
- Both cabinet sides
- The back wall
- The drain and disposal area
Photos help you see problems that a tape measure can miss. Look for supports, clips, braces, and pipes that may block a new sink.
Step 2: Measure the old sink
Measure the old sink’s outside length and width. Do not measure only the bowl openings.
If the sink has two bowls, measure:
- Total sink length
- Each bowl length and width
- Divider width
- Drain locations
- Depth of each bowl
Also note whether the bowls are equal or offset. An offset sink may place the drain in a different spot from a new equal-bowl sink.
Step 3: Inspect the cutout
Look for the countertop edge around the sink. Note whether the edge is:
- Flush with the sink wall
- Slightly over the sink rim
- Set back from the sink rim
These styles are often called zero reveal, positive reveal, and negative reveal. The terms describe how the countertop edge meets the sink edge.
Do not assume a new sink will use the same reveal. The countertop fabricator may need a new template or may need to alter the opening.
Step 4: Check the mounting method
Look below the counter for:
- Sink clips
- Metal brackets
- Epoxy anchors
- Support bars
- Silicone sealant
- Wood supports
- Rust or loose hardware
A heavy sink, such as a fireclay or thick composite sink, may need more support than a light stainless steel sink. The replacement sink’s instructions should state how it must be supported.
Step 5: Check drain and disposal space
Measure the distance from each drain to:
- The cabinet floor
- The back wall
- The side wall
- The garbage disposal
- The existing drain pipe
A deeper sink can lower the drain outlet. That may reduce the slope available for the drain pipe or force plumbing changes. A disposal can also sit lower than the existing one.
If the drain pipe must be moved, ask a plumber to review the layout before buying the sink.

How to Measure for a New Countertop
If you are ordering a new countertop, measure the cabinet and choose the sink before the counter is cut.
Give the countertop fabricator:
- Sink brand and model
- Sink template
- Sink specification sheet
- Desired reveal
- Faucet-hole layout
- Soap dispenser location
- Water-filtration faucet location
- Air-gap location, if required
- Countertop material and thickness
The fabricator normally uses the sink’s template to cut the opening. A product listing with a rounded measurement, such as “33-inch sink,” is not enough to make the cutout.
Why the sink template matters
The template shows details that a basic product page may not show, including:
- Exact cutout length
- Exact cutout depth
- Corner radius
- Faucet-hole requirements
- Minimum edge distance
- Mounting locations
- Reveal options
For a custom countertop, the template is usually more reliable than measuring the sink with a tape measure. The outer rim may have curves, lips, or irregular corners that are difficult to measure by hand.
How to Choose the Right Sink Size
Choose the sink size by comparing the cabinet, the counter, and the work you do at the sink.
A useful comparison looks like this:
| Kitchen condition | Usually favors |
|---|---|
| Small base cabinet | Smaller single-bowl sink |
| Wide cabinet with few drawers | Larger single- or double-bowl sink |
| Large baking trays | Wide, deep single bowl |
| Frequent hand washing and rinsing | Double bowl or bowl with accessories |
| Limited plumbing space | Sink with drain locations that match the existing layout |
| Tall users | A depth that does not force uncomfortable bending |
| Heavy sink material | Cabinet and counter support designed for the load |
This is a planning guide, not a universal size rule. The model’s minimum cabinet requirement still controls.
Example measurement
Suppose a U.S. kitchen has:
- 36-inch outside cabinet width
- 34 inches of clear interior width
- 24-inch counter depth
- 22-inch existing sink opening from left to right
- 20-inch existing opening from front to back
A replacement sink may fit only if:
- Its minimum cabinet size is 36 inches or less.
- Its overall size works with the cabinet interior.
- Its cutout covers or matches the existing opening.
- Its front-to-back size leaves enough counter material at the front and back.
- Its drains align with the existing plumbing or allow a plumbing change.
The exact answer still depends on the sink’s specification sheet and the countertop edge.
Measure Faucet and Accessory Holes Separately
An undermount sink does not usually include the faucet holes because the faucet sits in the countertop behind the sink.
Measure and plan for:
- Main faucet
- Soap dispenser
- Side sprayer
- Filter faucet
- Instant hot-water faucet
- Air gap, where required
- Sink accessories with faucet-mounted parts
Leave enough room behind the sink for the faucet base and for a person to operate the handle. A sink that sits too close to the backsplash may make the faucet difficult to install or use.
Check local plumbing requirements before finalizing the layout. Requirements can vary by location and by the type of appliance or plumbing system.
Check Sink Depth and Plumbing Clearance
A deeper bowl may be useful for washing large cookware, but it can create problems below the counter.
Before choosing a deep undermount sink, check:
- Distance from the bowl bottom to the cabinet floor
- Drain outlet height
- Garbage disposal position
- P-trap location
- Water filter housing
- Pull-out trash bins
- Shelves and drawers
- Cabinet doors
- Dishwasher drain connection
The sink’s listed depth is often measured from the top rim to the inside bottom. The plumbing needs space below the bowl, and the outer sink shape may extend lower than the usable bowl.
If the new sink is deeper than the old one, ask whether the drain needs to move. Do not cut cabinet parts or alter plumbing based on guesswork.
Common Measuring Mistakes
Measuring the bowl instead of the sink
The bowl is the inside working area. The cabinet and countertop must accommodate the sink’s full outside dimensions.
Using the cabinet size as the sink size
A 33-inch cabinet does not automatically take a 33-inch sink. Check the sink’s minimum cabinet size.
Ignoring the front and back counter edge
A sink can fit side to side but leave too little stone or solid surface at the front or backsplash. Measure the full counter depth.
Forgetting the corner radius
Two sinks may have the same length and width but different corner shapes. A tight corner may require a different countertop cutout.
Reusing the old cutout without checking coverage
The new sink rim may not cover the old opening. This can leave a visible gap or expose an unfinished counter edge.
Choosing a deeper bowl without checking the drain
The bowl bottom may sit lower than the existing drain connection. A plumber may need to change the drain layout.
Measuring only once
Take each key measurement twice. Measure the opening at the front, middle, and back when possible.
Cutting the counter before confirming the model
Do not approve a cutout from a rounded online dimension. Use the exact template for the exact sink model.
What to Do If the Sink Does Not Fit
If the sink is too wide for the cabinet, do not force it into place. Return it or choose a smaller model unless the cabinet can be safely modified by a qualified professional.
If the sink is too deep, check whether the drain, disposal, shelf, or cabinet floor is the problem. A plumbing adjustment may solve the issue, but the cabinet may still need support changes.
If the new sink does not cover the existing cutout, possible options include:
- Choosing a sink with a larger rim
- Recutting the countertop, if the material and edge allow it
- Replacing the countertop
- Using a different sink model
Stone, quartz, porcelain, and concrete work should be reviewed by a qualified countertop fabricator. A wrong cut can damage an expensive slab.
If the mounting system does not match the countertop, stop installation and follow the sink maker’s instructions. An undermount sink must be supported correctly. Silicone alone may not be enough for every sink or countertop combination.
A Printable Undermount Sink Measurement Checklist
Record these numbers before you shop:
- Cabinet outside width: ______
- Cabinet clear inside width: ______
- Cabinet interior depth: ______
- Countertop depth: ______
- Countertop thickness: ______
- Existing cutout length: ______
- Existing cutout front-to-back width: ______
- Front counter edge to sink opening: ______
- Backsplash to sink opening: ______
- Existing sink overall length: ______
- Existing sink overall width: ______
- Existing sink depth: ______
- Drain location: ______
- Disposal clearance: ______
- Faucet-hole count and location: ______
- Required minimum cabinet size for new sink: ______
- New sink cutout size: ______
- New sink overall dimensions: ______
- New sink depth: ______
Keep the sink model number with this list. Similar sink names can refer to different sizes or configurations.
Frequently Asked Questions
Do you measure the sink or the countertop cutout?
Measure both. The sink’s overall size must fit the cabinet, while the countertop cutout must match the manufacturer’s template. For a replacement, the new sink must also cover the old opening.
How much space should be around an undermount sink?
There is no single clearance that works for every sink. The required space depends on the sink template, countertop material, reveal, faucet location, and cabinet structure. Follow the sink maker’s template and your fabricator’s edge requirements.
Can I install a larger undermount sink in the same cabinet?
Sometimes, but only if the cabinet, counter, plumbing, and sink support allow it. A larger sink may require a new countertop cutout or cabinet changes. Check the minimum cabinet size before buying.
Can I replace an undermount sink without replacing the countertop?
Often, yes, if the new sink fits the cabinet and covers the existing opening. The sink must also match the cutout shape, reveal, mounting method, and plumbing layout. A countertop professional should inspect stone or quartz before any alteration.
Is a 30-inch sink the same as a sink for a 30-inch cabinet?
No. “30-inch sink” usually describes the sink’s general outside length or product category. The manufacturer may require a larger cabinet. Use the listed minimum cabinet size, not the product name alone.
Final Recommendation
Measure the cabinet first, then the existing cutout, plumbing, counter depth, faucet space, and sink depth. For new countertops, select the exact sink before fabrication and send the manufacturer’s template to the countertop professional.
The best fit is the sink that satisfies all of these conditions: it meets the minimum cabinet size, fits the counter opening, leaves enough counter around the edge, clears the plumbing, and uses the correct support system. If any measurement conflicts, pause before cutting or ordering materials.